Showing posts with label crafternoon. Show all posts

Tuesday, December 11, 2012

Joy-ful craftiness

 Ok, so I am on a serious crafting streak. Here's my latest.

It didn't take long to make and it's really pretty self explanatory.

So here's what you need:
Christmas-y card stock cut into 2-3 inch strips
{You'll need 2 for each letter of your word}
Christmas-y card stock
{cut into 1 large and 1 small circle for each letter}
Glue
Glitter
Staples
Hot glue gun/sticks
Wooden Letters
{or you can print out letters too!}

1. Fold your card stock strips accordion style.
2. Staple the ends together.
3. Press it flat.
4. It may try to pop back up on you...
5. Place something heavy on the top if this is the case.
6.Cut your circles.
7.Add some glue around the edges and dip it in glitter.
{or you can use glitter glue}
8. Use a hot glue gun to attach your center circles.
9. Mount this to your larger circle with a hot glue gun.
10. Use your hot glue gun to attach your letters.
11. Voila!
12.  I made a few extra to liven up last years project...

Remember my Paper wreath
Here it is with a new little twist...
 
   You can use any word really and change it up for any holiday or special occasion.  You can also add these little do-dads to anything you already have in assorted sizes and colors.
The possibilities are endless...So have fun with this one.

Wednesday, December 5, 2012

Christmas Craftiness: A Christmas Banner

I just cant get enough of the banners for my mantel lately...so here's another one!
I found the FREE printable banner here.
I put my own flare on it and there you have it!


Now go make one!

Saturday, December 1, 2012

Christmas Craftiness: Holiday Candles

I'm sure I'm not the first person to think of wrapping candle with paper, but I thought I would share my Christmas craftiness any way.
I wanted to liven up my candles for the holidays and found this cute paper here  to download and print.

Supplies:
candles
card stock
glitter/glitter glue
paper adhesive
rubber bands
paper cutter/scissors
First you want to print your paper on card-stock or use any wrapping paper, or scrap booking paper you want.  Then you cut the paper to about a centimeter taller than your candle.

Next you wrap the paper around the candle and glue it together.
 
 Wrap it with a couple of rubber bands to allow the glue to dry.  

Apply your glitter glue.  You can dip it in glitter while the glue is still wet for some extra bling too.

Let it dry and voila!
 

You've got yourself a whole new look for Christmas!

I found the printable sheet music and Christmas words at Altered Artifacts. 

Thursday, November 29, 2012

Christmas Craftiness: Gumdrop branches

I recently went to a color workshop at Ethan Allen  and learned a few tricks about decorating and adding color and elements to your decor on a buget.  So here's one of those super easy, cheap and crafty ideas.

Grab some branches out of your yard and spray them. {any color you like}
Poke some dots or gumdrops on the ends.
Stick them in a vase, spread them out on your mantel, use them as a centerpiece...whatever floats your boat.


So fun right?!?!

Friday, November 9, 2012

Thankful Craftiness

  Unfortunately I have gotten out of the habit of blogging, and the longer I wait, the more overwhelming it gets.  For that reason, I'm not going to waste precious time with my Mom guilt...I'm just going to dive on in and play catch up.

No Better way to get back into the blogging spirit than to start with a thankful post.
This house has been really focusing on being grateful for everything that we have.  Not just this month, but all year.  So I thought since the spotlight is on thankfulness this time of year I needed a few things to really hit this idea home, not just with the kids, but all of us.

I started with this adorable banner as a daily reminder.  I found the inspiration, and FREE printable letters here.  Then of course I put my own twist on them and mounted them to thick card-stock in the shape of flags.  I love how it turned out!


My next little project was really fun for the kids.  Lets face it though, ANY time I get out the finger paints, they are SUPER excited!

I simply printed this tree {which can be used for so many things by the way} and inserted my wording.  Then I got out some fall colored finger paints and let the boys go to town with finger print leaves.  How cute is this?!?!

Last, and certainly the most fun and meaningful, I made a little garland on our chandelier.  Nothing fancy, but worth while.  Everyday each of us writes one thing {and it can be ANYTHING! }we are thankful for on a leaf, smear a little glitter glue on it and hang it with a clothespin.   
I can not tell you how much I LOVE LOVE LOVE this one!  You can make a fireplace garland a larger tree and "pin the leaf on the tree".  Whatever you do, this one is worth it.     

So now go ahead and show your gratitude.  

Sunday, October 28, 2012

Spooky crafts

I know, I know, this would have been nice to see before Halloween, but better late that never.  I prefer to think of it as planning ahead for next year.

So I was so excited to find this FREE printable kit of spook decor to spruce up my mantle with.  It is called the Witches Larder and it even comes with cupcake toppers, menus and place cards if you're throwing a party.  I stuck with the decor items, but it was so easy that I think I have to do a banner for every holiday now.
All I had to do was print, cut and glue!
You can go as crazy as you want with it, and I'll probably pick it up a notch next year, but this is what I did this time.  So easy and so fun!

Click here for the free printable kit and have fun with it!

I used black glue sticks in my glue gun to create the top of the poison potion.  I spray painted my mason jar lids and found some spooky jar fillers at the dollar tree.

I used mini chocolate chips for witches moles and marshmallows for Luna Moth eggs.

The banner was the best part!  I printed it on heavy card-stock and used a hole punch and twine tied with knots.
I really had fun with it and plan on adding to it next year so stay tuned...

Monday, November 22, 2010

A Homemade Christmas Wreath


OK, so first off I have to give credit where credit is due. I got this great idea from the nato's. {thanks Jami!}   I did put my own little twist on it and I think it turned out great, if I do say so myself!  For the record, this was my first little rendezvous with a hot glue gun.  It definitely won't be my last though!  I think I am addicted.  I am now looking around the house trying to see what else I can make with it.  How have I never had one of these before now?  Anyway, for full instructions, go to Jami's blog as I am terrible with tutorials, but I'll give it a very basic and brief  try.

what you'll need:
a foam floral circle
an old book you don't care about anymore
a hot glue gun with clear sticks 
scissors
twine or ribbon

step 1)  
Rip out a bunch of paper from a book you really don't care about anymore.  I know it seems like your breaking some sort of law by doing this, but I promise the library cops have better things to do.

step 2) 
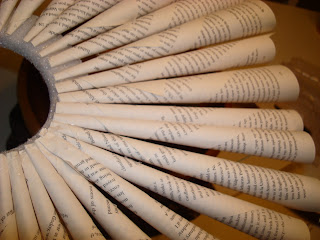
Roll a bunch of them into cone shapes and secure them with your glue gun on low heat.

Step 3) 
Attach with glue gun to the front of your foam circle like picture below.  

step 4)  
once you have completed the circle, cut off about an inch from the narrow side of your cone on about 15 or so {depending on how big your circle is}.  Save your tiny cones!

Step 5) 
Attach these trimmed cones to the outside upper edge of your ring.

step 6) 
Bend each cone toward the last round of attached cones.  Attach to other paper cones with a dot of glue to hold them down.  On my wreath, these end up on the back, so flip it over and move on to your next step.

step 7)  
OK, so I forgot to take a picture of the next step, so I will try to explain as best I can. Basically you repeat step five, but you cut it about an inch and a half and you attach them to the center of the ring.

step 8)  
Next you will basically repeat step 6.  Bend and attach with a dot of glue.

Step 9)  
line the center of your ring with paper and attach your ribbon, or twine for hanging.

step 10)  
glue your trimmings {mini cones} around the center.
Voila!  Here's your finished product! 
You could do this with virtually anything from felt to music sheets.  It's all good.

All in a crafternoon...If you try it out, send me a link.  I would love to see your version!